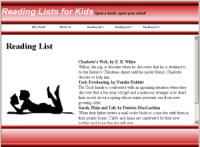
Two design templates used for the same EasySiteWizard Page

In this step, you need to select a template from which to build your site. The design template you choose will determine the colors and the overall look and feel of your website. The same EasySiteWizard page may look very different depending on the template you select.
|
Two design templates used for the same EasySiteWizard Page |
You can view your EasySiteWizard design choices by scrolling through the designs on the left. If you do not find one to your liking, change the category in the drop-down menu and display other templates. Click on one of the designs to select it. The design you have selected will be displayed in the middle of the window.
Some templates support additional customization options. These templates are marked with additional icons (see example below).

As indicated above, each thumbnail displays one or more icons indicating different types of customizability. A full list of icons and their meaning is provided below.
|
Icon |
Meaning |
|
|
Over the top left corner of every thumbnail, a white number on a blue background is displayed. This number indicates the maximum number of navigation buttons which can be used with this template. |
|
|
This icon indicates that a template is available in different color tints. Selecting one of these templates will display a small color palette on the left-hand side of the page. Clicking on the colors lets you select which tint you want. A preview of the template in that tint will be shown. |
|
|
This icon indicates that template "variants" (alternate images) are available. When a template marked by this icon is selected, a drop-down list is displayed, indicating what Template variations are available. |
|
|
This icon indicates that a section of the template can have a custom image uploaded. Selecting a template marked with this icon will allow the user to upload a custom image. For the best appearance, custom images should conform to the dimensions specified in the upload interface. |


